

What Template To Use On Xcode For A Dating App
Improving piece of work processes is always on a developer's mind. We're on the lookout for tools and solutions to speed up the coding, testing or organising our work. I find using templates for repetitive tasks a very good way to brand my work more than efficient. Today I'd like to show you how I make XCode Templates work for me. I hope this tutorial will exist helpful in improving your daily tasks too.
Table of contents
- What are XCode Templates?
- XCode Templates Installation
- File template structure
- Implementation and structure
Stride one. Let'south kickoff from the meridian. Here's the ViewController implementation
Footstep two. Model implementation
Step iii. View implementation
Footstep 4. ViewModel implementation - Using file templates in XCode
- Advanced options in Xcode templates
- Share XCode project templates
- Summary
What are XCode Templates?
XCode Templates is a tool for creating code snippets to give you a better starting signal to achieve your goal. In this tutorial I will walk y'all through preparing a custom template for MVVM project architecture.
Often we need to create from scratch the construction and files for a new module, and this process is pretty much the same each time. For case – in the MVVM pattern, to create a Login module nosotros demand to create folders and at to the lowest degree 4 classes:
- LoginModule Folder
- LoginView
- LoginViewModel
- LoginViewController
- LoginModel
Adding each class using required code is time consuming. With XCode templates we can speed upwardly the procedure of adding them to our project. I volition show y'all how to configure a template for use with a new MVVM module.
XCode Templates Installation
To install templates in XCode we demand to add a new folder which will contain our custom templates.
XCode iOS Templates location
All the Xcode custom template files are located in ~/Library/Programmer/Xcode/Templates/ and grouped into sections by folder proper noun. You can add it manually or using the last past running the post-obit command:
mkdir ~/Library/Developer/Xcode/Templates/Custom Templates
File template construction
Template primary folder
Each XCode file template is a split folder with the extension .xctemplate. If you desire to create a template named "View, Model & ViewModel", you lot have to create a binder named "View, Model & ViewModel.xctemplate" in ~/Library/Developer/Xcode/Templates/File Templates/Custom Templates.
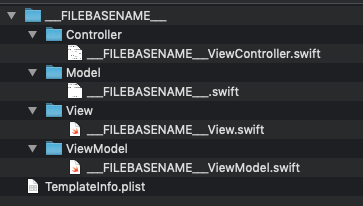
Template internal folders and files
The TemplateInfo.plist file contains basic template description. Implementation below gives us the ability to type Module name while creating XCode app templates with the wizard.
<?xml version="1.0" encoding="UTF-8"?> <!DOCTYPE plist PUBLIC "-//Apple tree//DTD PLIST i.0//EN" "http://www.apple tree.com/DTDs/PropertyList-1.0.dtd"> <plist version="1.0"> <dict> <key>Kind</primal> <string>Xcode.IDEKit.TextSubstitutionFileTemplateKind</string> <key>Platforms</key> <array> <string>com.apple.platform.iphoneos</string> </array> <key>Options</central> <array> <dict> <key>Identifier</key> <cord>productName</string> <central>Required</primal> <true/> <key>Name</key> <string>Module Name</cord> <key>Description</key> <cord>The proper name of the Model, View and ViewModel to create</string> <key>Type</key> <cord>text</cord> <primal>Default</key> <cord>Module1</string> </dict> </array> </dict> </plist> You can put pretty much anything into the bodily template file. You lot tin use text macros like ___FILEBASENAME___ to reference the filename. The proper name is derived from the productName option from our TemplateInfo.info file which is ready in new file wizard.
Implementation and construction
My template's folder structure, and Swift classes look like this:
Step 1. Permit's starting time from the top. Here's the ViewController implementation:
import UIKit course ___FILEBASENAMEASIDENTIFIER___: UIViewController { let viewModel: ___VARIABLE_productName___ViewModel let mainView: ___VARIABLE_productName___View init() { viewModel = ___VARIABLE_productName___ViewModel(withModel: ___VARIABLE_productName___()) mainView = ___VARIABLE_productName___View() super.init(nibName: cypher, bundle: zippo) mainView.configure(withViewModel: viewModel) } required init?(coder _: NSCoder) { fatalError("init(coder:) has not been implemented") } override func viewDidLoad() { super.viewDidLoad() setupView() } private func setupView() { view.addSubview(mainView) mainView.snp.makeConstraints { make in make.top.leading.trailing.bottom.equalToSuperview() } } } As you tin can see we implemented the following:
- proclamation of viewModel and mainView variables. It will contain our productName from TemplateInfo.plist prepare in file wizard
- initialization of in a higher place variables
- default initializer
- required initializer (we use ViewControllers from code, not Storyboards)
- viewDidLoad implementation
- setupView function calculation mainView and set SnapKit constraints
Step two. Model implementation:
import Foundation class ___FILEBASENAMEASIDENTIFIER___ { } The model class proper noun will be generated automatically by XCode so the above is just an example.
Footstep 3. View implementation:
import UIKit grade ___FILEBASENAMEASIDENTIFIER___: UIView { init() { super.init(frame: CGRect.naught) } required init?(coder _: NSCoder) { fatalError("init(coder:) has not been implemented") } func configure(with viewModel: ___VARIABLE_productName:identifier___ViewModel) { // configure the view with a ___VARIABLE_productName:identifier___ViewModel } } Course view
Class view contains a default initializer, and a required initializer – both required to initialize the View from the code. We also need to configure office to demark viewModel and the view. Note that ViewModel name is the same as the ViewModel name in the ViewController
Footstep 4. ViewModel implementation:
import Foundation class ___FILEBASENAMEASIDENTIFIER___ { private permit model: ___VARIABLE_productName:identifier___ init(withModel model: ___VARIABLE_productName:identifier___) { self.model = model } } ViewModel is initialized with our Model created in p.2.
Using file templates in XCode
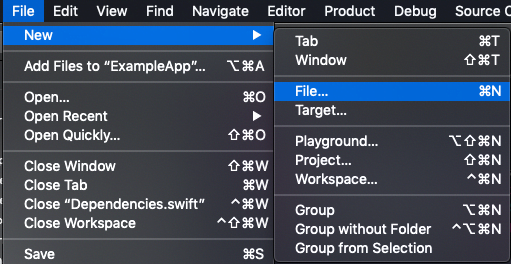
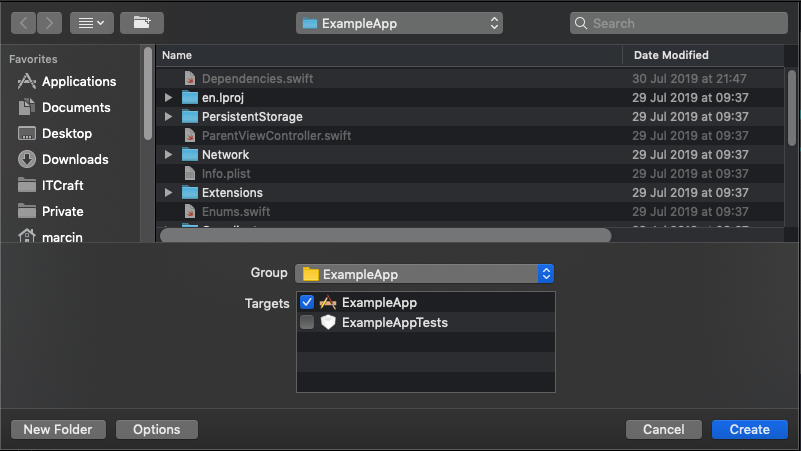
To get started You lot just need to click File -> New -> File…
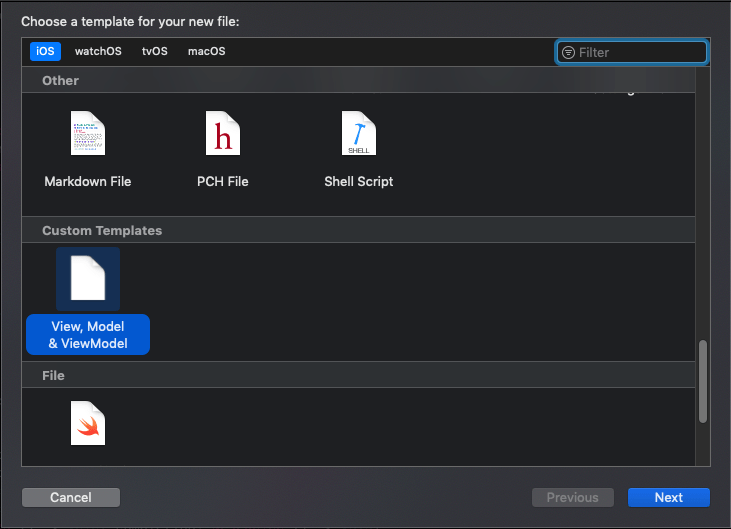
Detect your template in the list.
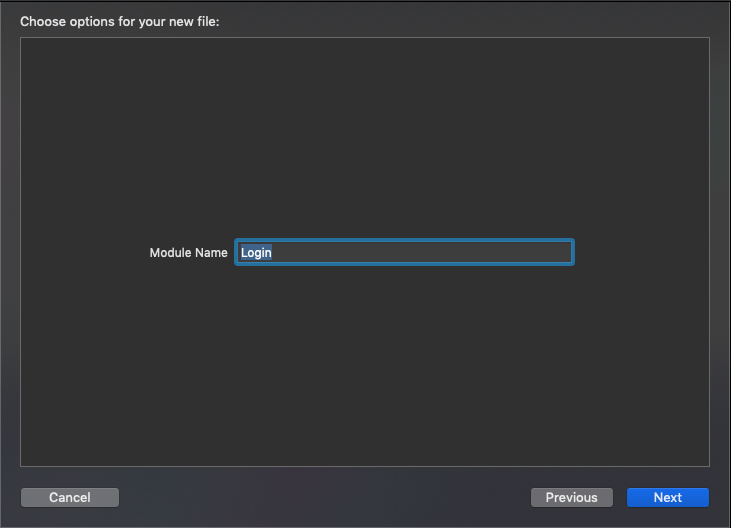
Then type the name of the module.
And add it to your project.
Advanced options in Xcode templates
Some example file templates demonstrating some of the options available can exist found on GitHub .
You tin also contrary engineer Xcode default templates and come across how to ameliorate custom templates for better apply. They are located in Xcode.app/Contents/Developer/Library/Xcode/Templates or Xcode.app/Contents/Programmer/Platforms/<platform_name>/Programmer/Library/Xcode/Templates.
In order to share your template with others you demand to send all of the template files. For someone else to be able to utilise information technology they need to add the template into the following folder:. ~/Library/Programmer/Xcode/Templates/File Templates/Custom Templates
and name information technology appropriately. Now the template is available in XCode.
Summary
This is a total working XCode template to speed upward your coding. You can change any part of the code to your needs. Here is a assist tip for text macro references:
TemplateInfo.plist tin can be more circuitous, you tin eg. apply the wizard to add together a selection list to pick files by type.Yous can too create your own default implementation and structure for new projects and targets.

What Template To Use On Xcode For A Dating App,
Source: https://itcraftapps.com/blog/xcode-templates-tutorial/
Posted by: lopesleou1984.blogspot.com
0 Response to "What Template To Use On Xcode For A Dating App"
Post a Comment